PHP
Creating the Grange Prize Online Vote
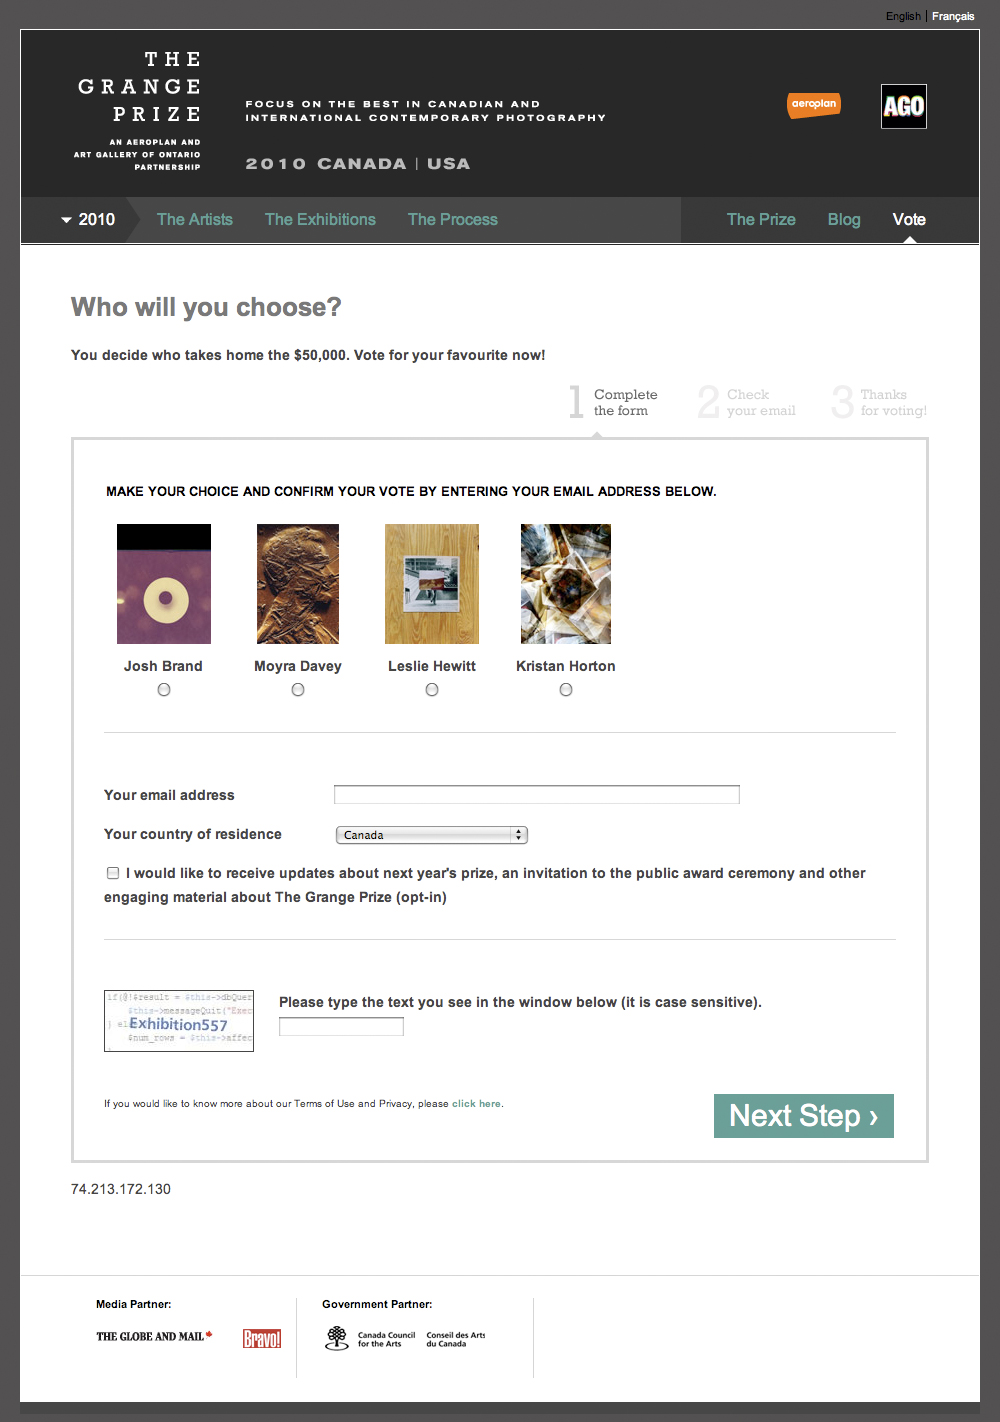
The Grange Prize is an annual contemporary photography prize. The winner is chosen through a people’s-choice vote conducted in-gallery and online. When the AGO took over the site this year, our goal was to create an easy to use and reasonably secure voting mechanism. The rules of the vote were simple — one vote per email address. This meant the main thing we needed to do was verify email addresses. We realized we already had the capability to do this, in the form of the double-opt-in mechanism of our list manager.
What is Double-opt-in? A user submits an address using an online form – that’s the first opt-in. Addresses are stored in the system and marked “unconfirmed.” Then the user confirms the action by clicking a link in an email – that’s the second opt-in. It is not until the verification link is clicked that it is marked as “active” or “confirmed.”
The choice being voted on – in our case Artists – were “segments” of the list. Segments are simply a second column of data, typically holding some sort of preference or demographic data.
So mainly we used the system as designed, simply changing the language presented to the user so that “subscribe” became “vote.” Easy!
Details, Details
There are many, many list management options out there. The ideas outlined above probably apply to any system. We happen to use a system called Cakemail, which has its own peculiarities.
In Cakemail, if a previously confirmed address is re-submitted it is marked as unconfirmed until the verification link is clicked. To ensure votes were not invalidated in this way we needed to check that an address had not already been confirmed.
Luckily, Cakemail provides a way to do this. If you pass an email address to a certian URL, it will return either a “1” or a “0” in response. So when the user submits their address we used this PHP class to get the response from that URL and from there it’s a simple ‘if/else” to either submit the address to the system or redirect to a ‘Sorry, you’ve already voted’ message.
One last thing to mention is the CAPTCHA, which is used to verify that the from is being submitted by a human being rather than an automated bot. For this we used eForm, which is part of the ModX content management system upon which the site was built.
Creating a WordPress Categories Page using Nested Loops
Do you find yourself with a bunch of Posts organized into Categories and are thinking, Wouldn’t it be nice to make a page where people can get a taste for what’s in each Category? I found myself in exactly this situation with Seth Anderson’s photography site.
First create a new file in your theme directory and call it page-categories.php:
<?php /* Template Name: Categories Page */ get_header(); ?> <h1><?php the_title(); ?></h1> <?php get_footer(); ?> |
Then go into WordPress and create a new Page. Call it Categories. Under Page Attributes there’s a drop down for Templates; select Categories Page. Save. You should now be able to pull up the page at /categories.
Back in the template file, add a line that gets the list of categories and store them in a variable. These parameters here are set to show the fullest categories first:
<?php $categories = get_categories( array ('orderby' => 'count', 'order' => 'desc' ) ); ?> |
Loop through the categories
This is the most important part. We’re going to loop through each of those Categories. Each time we do this we’re doing a query for posts in that Category. These parameters here are set to give us five random posts.
<?php foreach ($categories as $category) : ?> <?php query_posts( array ( 'category_name' => $category->slug, 'showposts' => '5', 'orderby' => 'rand' ) ); ?> <?php endforeach; ?> |
Loop through the posts
This is the second most important part. Inside that foreach, do a loop that prints out our list of posts:
<h2><?php single_cat_title(); ?></h2> <?php if ( have_posts() ): ?> <ul class="thumbs"> <?php while ( have_posts() ) : ?> <?php the_post(); ?> <li><a href="<?php the_permalink(); ?>"><?php the_post_thumbnail( array(151,151) ); ?></a></li> <?php endwhile; ?> </ul> <p class="more"><a href="/category/<?php echo $category->slug; ?>">More »</a></p> <?php endif; ?> |
The post_thumbnail bit is specific to my case of working on a photo site. You might use something else there, like the post title.
Classing the first thumbnail (Optional)
In CSS you can now use the pseudo-element li:first-child to give the first item in the list special styles, but old IE6-era habits die hard. Right before this line:
<?php while ( have_posts() ) : ?> |
Initiate a counter, like so:
<?php $i = 0; ?> |
And then, break up this line:
<li><a href="<?php the_permalink(); ?>"><?php the_post_thumbnail( array(151,151) ); ?></a></li> |
So that on the first pass though it prints a class, then iterates the counter so that it won’t do it again:
<li><a <?php if ( $i == 0 ) : ?> class="first" <?php endif; ?> <?php $i++; ?> href="<?php the_permalink(); ?>"><?php the_post_thumbnail( array(151,151) ); ?></a></li> |
This puts a class of “first” on the first item. (The :first pseudo class is obviously easier!)
Eliminating Duplicate Posts
It’s all there and working, but I’m not satisfied with how posts that are filed under multiple categories can show up repeatedly on the page. Luckily, Ben Gillbanks has posted a way to hide duplicate content across multiple loops. Insert the following into your functions.php:
$bmIgnorePosts = array();

/**
 * add a post id to the ignore list for future query_posts
 */
function bm_ignorePost ($id) {
	if (!is_page()) {
		global $bmIgnorePosts;
		$bmIgnorePosts[] = $id;
	}
}

/**
 * reset the ignore list
 */
function bm_ignorePostReset () {
	global $bmIgnorePosts;
	$bmIgnorePosts = array();
}

/**
 * remove the posts from query_posts
 */
function bm_postStrip ($where) {
	global $bmIgnorePosts, $wpdb;
	if (count($bmIgnorePosts) > 0) {
		$where .= ' AND ' . $wpdb->posts . '.ID NOT IN(' . implode (',', $bmIgnorePosts) . ') ';
	}
	return $where;
}

add_filter ('posts_where', 'bm_postStrip'); |
And then, back in the template file, right after this line:
<?php while ( have_posts() ) : ?> |
Insert this line:
<?php bm_ignorePost($post->ID); ?> |
And that’s it!
The Complete File
Here’s the whole thing:
<?php
/*
Template Name: Categories Page
*/
get_header(); ?>
<h1><?php the_title(); ?></h1>
<?php $categories = get_categories( array ('orderby' => 'count', 'order' => 'desc' ) ); ?>
<?php foreach ($categories as $category) : ?>
<?php query_posts( array ( 'category_name' => $category->slug, 'showposts' => '5', 'orderby' => 'rand' ) ); ?>
<h2><?php single_cat_title(); ?></h2>
<?php if ( have_posts() ): ?>
<ul class="thumbs">
<?php $i = 0; ?>
<?php while ( have_posts() ) : ?>
<?php bm_ignorePost($post->ID); ?>
<?php the_post(); ?>
<li><a
<?php if ( $i == 0 ) : ?>
class="first"
<?php endif; ?>
<?php $i++; ?>
href="<?php the_permalink(); ?>"><?php the_post_thumbnail( array(151,151) ); ?></a></li>
<?php endwhile; ?>
</ul>
<p class="more"><a href="/category/<?php echo $category->slug; ?>">More »</a></p>
<?php endif; ?>
<?php endforeach; ?>
<?php get_footer(); ?> |
Showing Images from the WordPress Attachments Gallery
I’ve been upgrading artist Flavio Trevisan’s site to take advantage of some of the features that have been added to WordPress since we first did the implementation. This gave me the opportunity to revisit a PHP function I use to pull images from the WordPress attachment gallery for use in jQuery slideshows.
The jQuery (which I won’t go into here) looks for a div classed “gallery” containing a series of divs classed “slide”.
Inside our theme’s functions.php file, we’ll create our function:
<?php function marty_get_images($post_id) { global $post; } ?> |
Which we will then be able to call within the loop like so:
<?php marty_get_images("$post->ID"); ?> |
Loop through the images
Next, we’re going to load the images associated with this Post ID to a variable:
$images = get_children( array('post_parent' => $post_id, 'post_status' => 'inherit', 'post_type' => 'attachment', 'post_mime_type' => 'image', 'order' => 'ASC', 'orderby' => 'menu_order ID') ); |
Now, so long as we do in-fact have images, we’re going print out the “gallery” div that’s going to wrap our slides:
if ($images) : echo '<div class="gallery">'; echo '</div><!-- End gallery -->'; endif; |
Between the beginning and end of that div we’ll loop through each image in the standard way:
foreach ($images as $attachment_id => $image) : endforeach; |
Exclude Post Thumbnail
I’m going to take a step back here and mention a feature you may or not want to include. On Flavio’s site we’re using specially-created images for the Post Thumbnails which are associated with the post but we don’t want to include in our gallery.
Up at the top of the function, we get the ID of the assigned thumbnail:
$thumbnail_ID = get_post_thumbnail_id(); |
And then, inside our foreach:
if ( $image->ID != $thumbnail_ID ) : endif; |
Output HTML
Inside there, assign each of the fields we want to output to a variable. If the alt field is empty we’ll use title (which is required) in it’s place.
$img_title = $image->post_title; // title. $img_caption = $image->post_excerpt; // caption. $img_description = $image->post_content; // description. $img_alt = get_post_meta($attachment_id, '_wp_attachment_image_alt', true); //alt if ($img_alt == '') : $img_alt = $img_title; endif; $src_array = image_downsize( $image->ID, 'large' ); $img_url = $src_array[0]; |
And now it’s time to output the HTML of the slides:
<div class="slide"> <div class="description"> <p class="title"><?php echo $img_title; ?></p> <?php if ($img_caption) : echo wpautop($img_caption, 'caption'); endif; ?> <?php if ($img_description) : echo wpautop($img_description); endif; ?> </div> <div class="image"> <p><img src="<?php echo $img_url; ?>" alt="<?php echo $img_alt; ?>" title="<?php echo $img_title; ?>" /></p> </div> </div> |
And that’s it!
The Complete Function
Here’s the whole thing:
<?php function marty_get_images($post_id) { global $post; $thumbnail_ID = get_post_thumbnail_id(); $images = get_children( array('post_parent' => $post_id, 'post_status' => 'inherit', 'post_type' => 'attachment', 'post_mime_type' => 'image', 'order' => 'ASC', 'orderby' => 'menu_order ID') ); if ($images) : echo '<div class="gallery">'; foreach ($images as $attachment_id => $image) : if ( $image->ID != $thumbnail_ID ) : $img_title = $image->post_title; // title. $img_caption = $image->post_excerpt; // caption. $img_description = $image->post_content; // description. $img_alt = get_post_meta($attachment_id, '_wp_attachment_image_alt', true); //alt if ($img_alt == '') : $img_alt = $img_title; endif; $big_array = image_downsize( $image->ID, 'large' ); $img_url = $big_array[0]; ?> <div class="slide"> <div class="description"> <p class="title"><strong><?php echo $img_title; ?></strong></p> <?php if ($img_caption) : echo wpautop($img_caption, 'caption'); endif; ?> <?php if ($img_description) : echo wpautop($img_description); endif; ?> </div> <div class="image"> <p><img src="<?php echo $img_url; ?>" alt="<?php echo $img_alt; ?>" title="<?php echo $img_title; ?>" /></p> </div> </div> <?php endif; ?> <?php endforeach; ?> </div><!-- End gallery --> <?php endif; } ?> |
Creating a WordPress Tag Search using jQuery
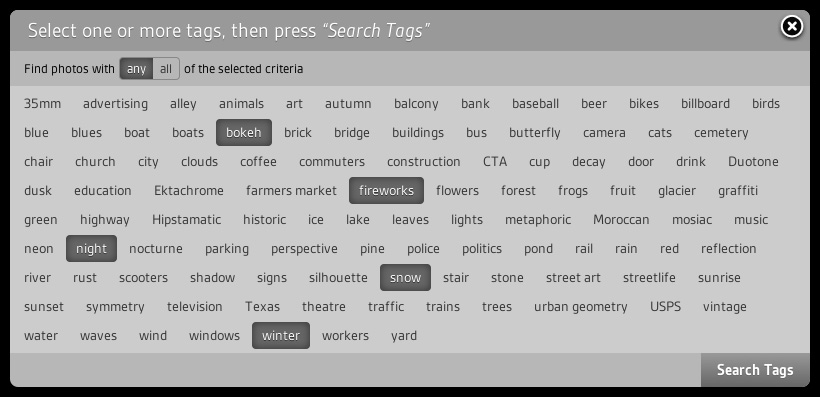
The WordPress taxonomy functions make it easy to give your visitors links to per-tag archives of posts. But is it possible to give them archives of more than one tag? Sure it is!
“Any” & “And” Tag Intersections
By passing parameters via the URL, WordPress will create pages for the intersections of multiple tags. This means we can get posts with any of the tags by separating terms with a comma, like so: /?tag=onetag,anothertag. That is to say a post must have one but need not have all of the tags to qualify.
Conversely, we can get posts with all of the tags by separating terms with a plus, like so: /?tag=onetag+anothertag. This will return only posts that have every tag. There’s various issues with the default output of this, however, so go ahead and install the tTDO Tag Fixes plugin. Running this plugin changes the “all” URL string to /?tdo_tag=onetag+anothertag.
Show All Tags
The first thing we’ll do is print out all the tags, with links, onto the page. This goes in your theme’s functions.php:
function showalltags() { $tags = get_tags(); $html; foreach ($tags as $tag){ $tag_link = get_tag_link($tag->term_id); $html .= "<a href='{$tag_link}' title='{$tag->name} Tag' class='{$tag->slug}'>"; $html .= "{$tag->name}</a>"; } echo $html; } |
And output it somewhere in your theme like so:
<div class="taxonomies"> <h3 id="tags">Tags</h3> <div class="taglist"><?php showalltags(); ?></div> </div> |
Rewrite the markup
Now we’re going to use JavaScript to update the page’s markup to reflect the JavaScript-dependent functionality we’re building. We do this with JS because these controls are only relevant to users with JS-enabled browsers — for others their presence would only be confusing.
Get your jQuery(document).ready(function($) started then include this:
function initialLoad () { $('.taxonomies h3').html('Select one or more tags, then press <em>“Search Tags”</em>'); $('.taglist').before('<div class="searchcontrols"><span>Find photos with </span><a id="any" class="tagtoggle selected">any</a><span class="slash"> / </span><a id="all" class="tagtoggle">all</a><span> of the selected criteria</span></div>'); $('.taxonomies').append('<div><a class="searchtags">Search Tags</a></div>'); } initialLoad(); |
Capture tag clicks
When a user clicks a tag, we’ll override the link and instead add the class “selectedtag”:
$('.taglist a').bind('click', function(event) { event.preventDefault(); if ( $(this).hasClass('selectedtag') ) { $(this).removeClass('selectedtag'); } else { $(this).addClass('selectedtag'); } }); |
Toggle “Any” & “And”
Similarly, capture clicks to the controls:
$('.tagtoggle').bind('click', function(event) { event.preventDefault() $('.tagtoggle').removeClass('selected'); $(this).addClass('selected'); }); |
Construct the URL
This function is the core of the mechanism:
function searchTags() { var optionTexts = []; // For each selected tag... $('.selectedtag').each(function() { // capture the slug from class (stripping out the " selectedtag") var str = $(this).attr('class').replace(/\sselectedtag+/g, ''); // and add it to an array optionTexts.push(str); }); // Set the URL format appropriate to the selected search type if ( $('#any').hasClass('selected') ) { var param = 'tag'; var separator = ','; } else { var param = 'tdo_tag'; var separator = '+'; } // Put the tag list together var tagstring = optionTexts.join(separator); // And send them off to the final, constructed URL window.location = '/?' + param + '=' + tagstring; } |
Enable the Search Button
Last but not least, the action on the search button calls the search function:
$('.searchtags').bind('click', function(event) { event.preventDefault() searchTags(); }); |
And that’s it! You can grab the complete code from Gist.
Updated December 10, 2011 to capture the tag slug from the class, rather than inferring it from the tag name.
Updated May 20, 2012 to reflect a suggestion made by commenter Fris.
Updated May 20, 2013 to reflect a IE7 fix submitted by Betty Jašková.
Integrating WordPress and Google Maps API V.3
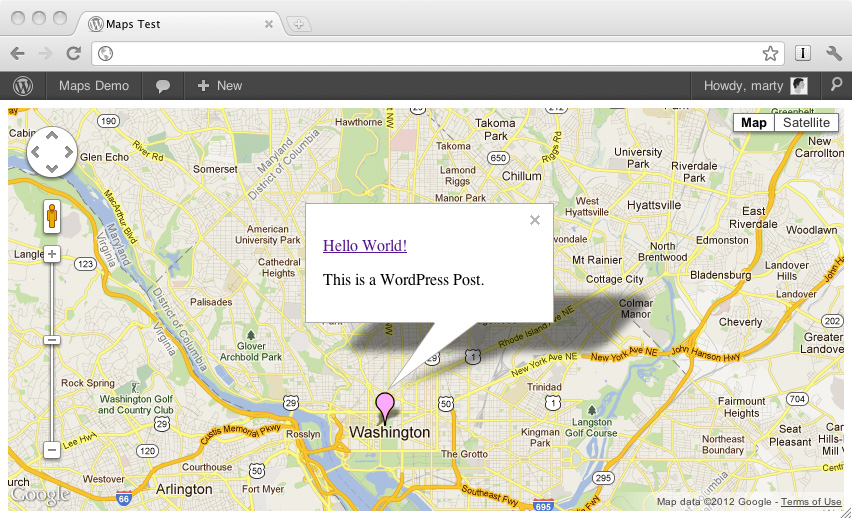
Here we will go through the steps for creating a Google Maps interface for a WordPress blog. Posts will appear as markers on the map, which you can click to reveal the post content in the Google Maps Infowindow.
Download a ZIP of the complete example.
Note, August 24 2013: In August 2013 Google updated the API to a new visual style that more closely matches their core products. One of the changes is that markers no longer display shadows. There may be other side effects as well, though as of this writing everything else seems to work properly. More investigation is warranted.
Also, a lot of people have trouble getting their markers to display. Often this has to do with the path to the image file. If you download the ZIP from Github, you will likely need to update the paths in map.js. Eventually I’ll revise the tutorial to address this, but in the meantime it’s something to keep an eye out for.
I’m starting with a fresh WordPress install, which at the time of this writing is v. 3.3.1. You may be modifying an existing theme, but for the sake of this tutorial, I’ll start a new one. But note that I’ll be doing only the minimum here to create a working demo, omitting much that is necessary for an actual, standards-compliant and useful website.
Add Location Data to Posts
Update: I’ve published the Address Geocoder plugin for WordPress that simplifies the process of adding location data to posts. I recommend using it instead of the custom fields technique outlined here. After installing it, skip to the next section, “Initialize Custom Theme,” below. Your code will need to be modified in three places, as noted below.

In order to know where to place a marker on a map, the Google Maps API needs to be supplied with latitude and longitude coordinates in the format of a LatLng object. We’re going to include this as a Custom Field with our posts.
Navigate to the Post Edit page and scroll down to the Custom Fields box. (If you don’t see it, you may need to turn it on via the Screen Options button at the top of the page.)
Name the custom field “latlng.” Now, there are various geocoding services on the web that allow you convert an address to latlng (including the Google Maps API itself, but that’s another topic). For this example we’ll use the White House. Go to Geocoder.us and enter “1600 Pennsylvania Avenue NW, Washington DC”. It will spit out a number in brackets such as (38.898748, -77.037684). Use that as the value and press Add Custom Field.
If you like, you can optionally create a few more posts and geocode them with locations in Washington DC.
Initialize a Custom Theme
In the wp-content/themes directory, create a new folder; mine will be called mapdemo. In this new folder, create a blank file called style.css and one called index.php; these are the minimum needed to created a WordPress theme. Also create a file called map.js.
To make our theme recognizable by WordPress we will place what’s called a theme header into our style.css. The very minimum header is as follows:
/*
Theme Name: Map Demo
*/ |
You can now go ahead and activate your theme using the WordPress dashboard (Appearance -> Themes). But if you load your blog at this point you will see that it’s totally blank. Let’s put in the bare-bones of an HTML page, with a couple of functions required by WordPress. Put the following into index.php:
<html> <head> <title>Maps Test</title> <?php wp_head(); ?> </head> <body> <?php wp_footer(); ?> </body> </html> |
Link the JavaScript Files
Our map will be created using two JavaScript files: The Google Maps API library and our own maps.js. We do this in the head section of index.php, after the title tag. To include the API we will link directly to the file on Google’s server:
<script type="text/javascript" src="http://maps.googleapis.com/maps/api/js?sensor=false"></script> |
And to include maps.js we will do something similar, but you’ll notice that we use WordPress’ get_stylesheet_directory_uri() function to dynamically write the path to the file in our theme directory:
<script type="text/javascript" src="<?php echo get_stylesheet_directory_uri() ?>/map.js"></script> |
Create the Map
WordPress uses something called The Loop to display posts. Let’s get that started by testing if, given the parameters passed via the URL, WordPress has any posts to display. In index.php, after the opening body tag, write:
<?php if ( have_posts() ) : ?> <!-- WordPress has found matching posts --> <?php else : ?> <!-- No matching posts, show an error --> <h1>Error 404 — Page not found.</h1> <?php endif; ?> |
Note: If you are interested in using this with a custom post type, depending on the context your loop may look different. Perry at Point At The Moon has posted a follow-up tutorial that includes custom post types.
Next create a DIV element that will be the container for our map; we’ll tell the API its name and Google will fill it with magic! We’ll use CSS to make it fill the window. After the line with the “WordPress has found matching posts” comment, write:
<div id="map" style="width: 100%; height: 100%;"></div> |
Now open up maps.js. We’re going to create a JavaScript function that loads in a map with a few settings, which I won’t go into the details of here, but are well documented. Write:
function initialize() { map = new google.maps.Map(document.getElementById('map'), { zoom: 12, center: new google.maps.LatLng(38.898748, -77.037684), mapTypeId: google.maps.MapTypeId.ROADMAP }); } |
Note: I’ve created a follow-up post on centering the map on the latest post.
But, like all functions, it’s not enough to define it — it must also be called. We’ll do this by modifying the body tag of index.php, like so:
<body onload="initialize()"> |
Reload your page and you should now see a map filling the window, centred on Washington DC.
Place the Markers
The way we’re going to get our markers onto the map is to:
- create a list (an array) of locations;
- specify the images we’re going to place at those locations;
- then go through (iterate) through the list, placing each one.
First up, the locations. We’re going to finish up that WordPress loop we started, where for each post we output an item in an array called “locations.” At this point we’re going to output only our “latlng” custom field, not the post title or content or any of the others. In index.php, right above the div with the ID of “map”, write this:
<script type="text/javascript"> var locations = [ <?php $i = 1; while ( have_posts() ) : the_post(); ?> <?php if ( get_post_meta($post->ID, 'latlng', true) !== '' ) : ?> { latlng : new google.maps.LatLng<?php echo get_post_meta($post->ID, 'latlng', true); ?>, }, <?php endif; ?> <?php $i++; endwhile; ?> ]; </script> |
Note: If you are using the Address Geocoder plugin, here are the first two modifications you need to make. Change the two instances of get_post_meta($post->ID, ‘latlng’, true) to get_geocode_latlng($post->ID).
Next we’ll define the images we want to use as markers. Each marker has two parts — the marker itself and its shadow, and for each you will supply paths to images of your choosing; I’ve included a couple in the ZIP, linked above, or you can use your own. Upload the images into your theme folder. At the very top of maps.js, above the initialize function, write:
var pinkmarker = new google.maps.MarkerImage('/wp-content/themes/mapdemo/pink_Marker.png', new google.maps.Size(20, 34) ); var shadow = new google.maps.MarkerImage('/wp-content/themes/mapdemo/shadow.png', new google.maps.Size(37, 34) ); |
If you are using your own images you will want to check Google’s documentation of the MarkerImage options to see what each part of these lines mean, so that you can customize them.
Note: I’ve created a follow-up post on using the post’s Featured Image as the marker.
And the final step is to loop through the locations, placing a marker for each onto the map. In maps.js, within the “initialize” function, after the “var map…” block, write:
for (var i = 0; i < locations.length; i++) { var marker = new google.maps.Marker({ position: locations[i].latlng, icon: pinkmarker, shadow: shadow, map: map }); } |
Reload your page and you should now see your marker(s) placed on the map.
Enable the Infowindow
Our last task is to create a Google Maps “infowindow” which will pop-up when a marker is clicked, showing the title and content of the post. We will do this by:
- outputting the content into a hidden div;
- referencing that div in our array of locations;
- and adding what’s known as a “click listener” to our JavaScript function to open the window.
First up, the content. This will be a a second “while” loop, immediately before the one we wrote previously. It will output a series of DIVs, each with a unique ID and containing content to be shown in the infowindow. In index.php, directly following the “matching posts” comment line, write:
<div style="display: none;"> <?php $i = 1; ?> <?php while ( have_posts() ) : the_post(); ?> <?php if ( get_post_meta($post->ID, 'latlng', true) !== '' ) : ?> <div id="item<?php echo $i; ?>"> <p><a href="<?php the_permalink(); ?>"><?php the_title(); ?></a></p> <?php the_content(); ?> </div> <?php endif; ?> <?php $i++; ?> <?php endwhile; ?> </div> |
Note: If you are using the Address Geocoder plugin, here’s the third modification you need to make. Change get_post_meta($post->ID, ‘latlng’, true) to get_geocode_latlng($post->ID).
Next add a reference to these DIVs to our locations object. Directly after this line:
latlng : new google.maps.LatLng<?php echo get_post_meta($post->ID, 'latlng', true); ?>, |
Add this:
info : document.getElementById('item<?php echo $i; ?>') |
Now define the infowindow (documentation at Google). Switch over to maps.js and, at the very top, write this:
var infowindow = new google.maps.InfoWindow(); |
Finally, add a click listener for each marker. Within the “for…” block of the “initialize” function, after the “var marker…” block, write:
google.maps.event.addListener(marker, 'click', (function(marker, i) { return function() { infowindow.setContent(locations[i].info); infowindow.open(map, marker); } })(marker, i)); |
And that’s it! Reload the page and you will now be able to click the marker(s), opening up an infowindow containing the post content. Mission accomplished!
Using the WordPress Featured Image / Post Thumbnail as a Google Maps Marker
This is a follow-up to my previous post on combining WordPress and Google Maps. Jayc asks:
“Is there any way to change the MarkerImage to the featured image for the post?”
Yes, there is!
But one thing to keep in mind is that markers are not one image but two — the marker itself and the shadow. What we’re going to cover here will show how to use the Featured Image as the marker, while continuing to use a single shadow across all posts. This means it is appropriate for markers that share the same size and silhouette.
We’ll be using the code from the previous post as the starting point. The complete example with these changes applied is also available for download from GitHub.
Initiate Featured Images
Create a new file in your theme directory, called functions.php. In it, write:
<?php // Featured Images / Post Thumbnails if ( function_exists( 'add_theme_support' ) ) { add_theme_support( 'post-thumbnails' ); } ?> |
This is the basic code. For more features see Post Thumbnails in the Codex.
When you go to your Post Edit screen you will now see a metabox called Featured Image. Clicking the link, you will be prompted to upload a file. Once you have done that, click the “Use as featured image” link (it’s next to “Insert into post”).
Make a marker declaration in the loop
We’re going to move our marker declaration into the WordPress loop. We are going to add another parameter to our locations variable, so in index.php look for the line:
info : document.getElementById('item<?php echo $i; ?>') |
And place a comma at the end of it.
Because Featured Images are not required by WordPress when publishing a post, we will test if one has been set and to provide a fallback. On the next line include the following test:
<?php if ( has_post_thumbnail() ) { ?> // There is a Featured Image <?php } else { ?> // No Featured Image, use fallback <?php } ?> |
And under “use fallback”, define a fallback image
// No Featured Image, use fallback
marker : new google.maps.MarkerImage('<?php echo get_stylesheet_directory_uri() ?>/pink_Marker.png', new google.maps.Size(20, 34) ) |
Get the path to the Featured Image
The normal way to access the post thumbnail is to use the the_post_thumbnail() function, but this returns a full img tag. We want only the image path, so let’s make our own function that does this. Open functions.php and add:
function get_thumbnail_path($post_ID) { $post_image_id = get_post_thumbnail_id($post_ID->ID); if ($post_image_id) { $thumbnail = wp_get_attachment_image_src( $post_image_id, 'post-thumbnail', false); if ($thumbnail) (string)$thumbnail = $thumbnail[0]; return $thumbnail; } } |
And back in index.php, under the “There is a Featured Image” comment, create a marker declaration that includes a call to the function:
// There is a Featured Image
marker : new google.maps.MarkerImage('<?php echo get_thumbnail_path($post->ID); ?>', new google.maps.Size(20, 34) ) |
Update the map JavaScript
Last but not least, we’ll modify the maps.js to reflect our changes. Find the line that declares the “pinkmarker”:
var pinkmarker = new google.maps.MarkerImage('/wp-content/themes/mapdemo/pink_Marker.png', new google.maps.Size(20, 34) ); |
and remove it; it’s no longer needed. Next, look for the line:
icon: pinkmarker, |
And change it to:
icon: locations[i].marker, |
And that’s it! Save everything and you should now see the featured image loaded as the marker.
Center a Google Map on the Latest WordPress Post
This is a follow-up to my previous post on integrating WordPress and Google Maps. Damien asks:
“Would it be possible to centre the map on my latest post?”
Yes, it is!
This builds off the example in the previous post and I’m using the Address Geocoder plugin to set latlngs. You can see and download the entire working example at GitHub.
Output the JavaScript with PHP
The line that defines the center of the map is presently specified in a static way — we arbitrarily chose a location and included its latlng in the JavaScript function initialize(). Now we will revise this so that it is pulling a dynamic variable from WordPress. There are a number of ways to accomplish this, but here we’re going to go with the most straightforward, which is to move the entire contents of the static maps.js into the dynamic index.php.
Open maps.js and copy the contents to your clipboard. Then open index.php and look for this line:
<script type="text/javascript" src="<?php echo get_stylesheet_directory_uri() ?>/map.js"></script> |
Remove the src parameter and paste the JavaScript between the opening and closing tags so that you have this:
<script type="text/javascript"> var infowindow = new google.maps.InfoWindow(); var pinkmarker = new google.maps.MarkerImage('/wp-content/themes/mapdemo/pink_Marker.png', new google.maps.Size(20, 34) ); var shadow = new google.maps.MarkerImage('/wp-content/themes/mapdemo/shadow.png', new google.maps.Size(37, 34) ); function initialize() { map = new google.maps.Map(document.getElementById('map'), { zoom: 12, center: new google.maps.LatLng(38.898748, -77.037684), mapTypeId: google.maps.MapTypeId.ROADMAP }); for (var i = 0; i < locations.length; i++) { var marker = new google.maps.Marker({ position: locations[i].latlng, icon: pinkmarker, shadow: shadow, map: map }); google.maps.event.addListener(marker, 'click', (function(marker, i) { return function() { infowindow.setContent(locations[i].info); infowindow.open(map, marker); } })(marker, i)); } } </script> |
Next we are going to add in a simple WordPress loop to get the single latest post and assign its latlng to a PHP variable.
Right inside the initialize() function, before the definition of map, add:
<?php $the_query = new WP_Query('showposts=1'); while ( $the_query->have_posts() ) : $the_query->the_post(); $coordinates = get_geocode_latlng($post->ID); endwhile; ?> |
And lastly, output that variable to the line that defines the map’s center, in place the static latlng. Look for this line:
center: new google.maps.LatLng(38.898748, -77.037684), |
And change it to this:
center: new google.maps.LatLng<?php echo $coordinates ?>, |
Done! On load, your map will now center on the marker of the latest post.